
So perhaps you’ve seen our first post about installing hooks in the Airstream and are ready (like we were) to take things up a notch and move onto bigger projects. Like shelves.
Ordinarily, installing shelves at home is pretty simple. But things get complicated when your walls are made of aluminum or fiberglass and there’s no wooden stud to drill a fastener into.
 In our Airstream (an International, 27FB) the dinette turns into a “couch” or extra bed. We like this configuration for lounging and movie watching and such, except that there’s no place to put our BEER! So we decided a small shelf was in order.
We perused our not so local IKEA (we drove 2 hours each way to get this stuff) and found the perfect combination for our all silver interior. We purchased the EKBY BJARNUM shelf brackets and the EKBY MOSSBY shelf.
In our case, we wanted just some small shelves, so using a chop saw we cut the one 32″ shelf into 3 smaller pieces, measured to fit in the spaces we had between the dinette windows and door frame.
Installing the shelves
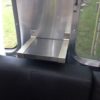
- If possible, align the shelf brackets with an existing row of screws or rivets. This helps ensure that there will be adequate material to fasten to.
- Start with one bracket, considering your travel trailer moves, it’s probably not perfectly level. Because of that, use existing lines to square up this bracket rather than a traditional bubble level. For example, align the bracket with the frame of the door or window, using them to ensure the bracket is parallel.
- Carefully mark the mounting holes and drill 1/8″ holes, using a stop or being extremely careful to just drill deep enough to penetrate the material. Using cutting oil can help ensure a clean hole and extend the life of your drill bit.
- Install the first bracket completely, using either pop rivets or screws, depending on your preference and the amount of material available to fasten to. (for pop rivet instructions, see our post on rivets, it’s riveting).
- Cut your shelf to size, measure twice, cut once.
- These brackets have a large “pocket” which will help to compensate for the curve of the walls and will hide the cut ends of our shelf.
- Insert the shelf into the already installed bracket
- Now, “dry fit” the next bracket in place, adjusting the angle of the shelf in the pockets until the correct fit is found, allowing the second bracket to be fit squarely on the wall.
- Either use another existing “line” in the camper to align the shelf, or use a bubble level, but use an existing surface to find the “level” of the camper first. For example, if you want to use a bubble level for the shelf, place it on the camper floor first, running parallel to the shelf and determine the “level” of the camper. Mark the bubble location as “center” and then use this as the “center” for the shelf.
- Mark the holes and drill as above.
- Install the shelf and then the bracket, screws or rivets as above.
- Finally, install the small included screws in the bottom of the brackets into the shelf to secure the entire unit into one strong piece.
There you have it. You’ve installed some shelves in your Airstream or travel trailer!
The Beer
Considering this project required using a chop saw and power tools, we waited till it was done to enjoy some Hop Nosh by Uinta. We’d suggest you do the same.
Did you use a blade for metal or wood materials on the chop saw when cutting the mossby shelf? Thanks!!
Used a blade for metal. The interiors of these shelves are actually just some kind of pressed cardboard, so the metal blade handled that part easily. Making a clean cut through the stainless was the bigger concern. Cheers!